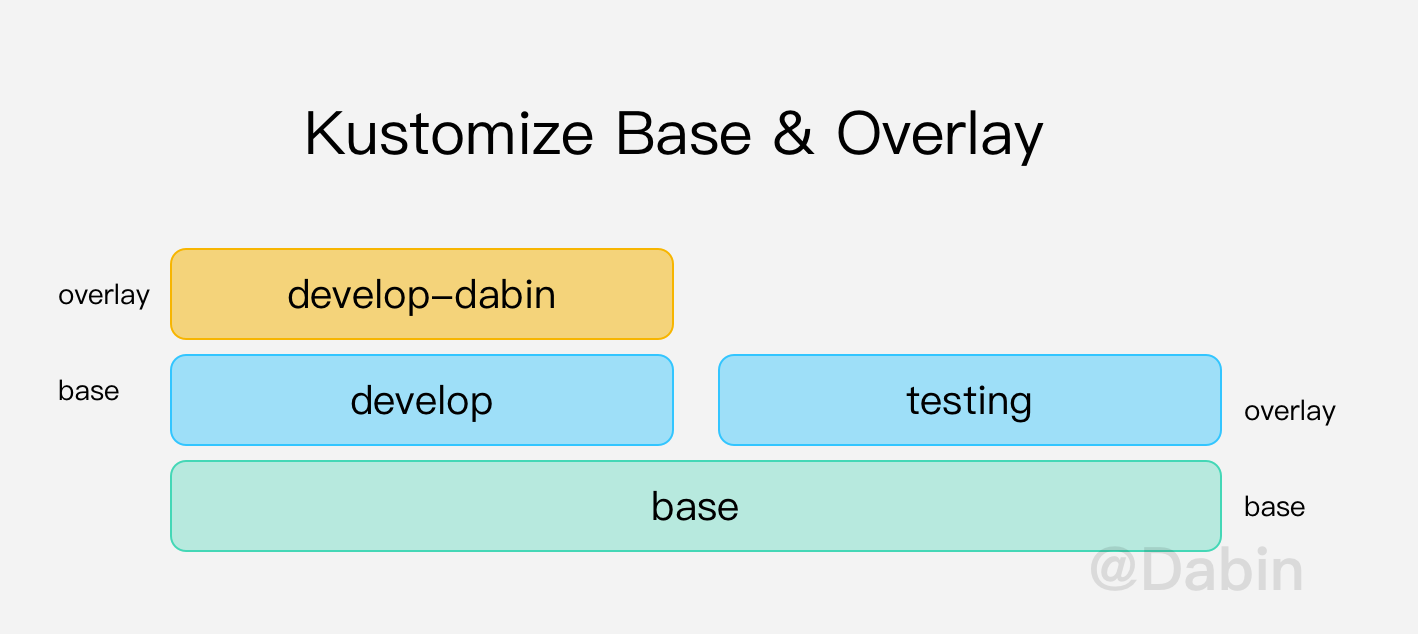
kustomize简介 kustomize 是一个自定义管理原始的YAML模板资源文件的工具,同时无需修改原始的YAML文件。
对于kustomize的理解是,它借助了docker镜像的类似概念:可以一层层的进行覆盖。
Kustmoize有Base和Overlay 2个概念,被依赖的层成为base,当前进行覆盖操作的层成为overlay。所以1个overlay,也可以是另外overlay的base。
在kubectl v1.14之后,其中融合了kustomize,也就说如果安装了kubectl无需安装kustomize,即可使用kustomize。
把kustmoize的资源文件部署到集群有2个办法:
通过kubectl内置的kustomize:kubectl apply -k $KUSTOMIZE_DIR 应用到集群。
集合kustomize和kubectl: kustomize build $KUSTOMIZE_DIR | kubectl apply -f -应用到集群。
base nginx-deployment.yaml:
1
2
3
4
5
6
7
8
9
10
11
12
13
14
15
16
17
18
19
20
21
22
23
24
25
26
27
28
apiVersion: apps/v1 kind: Deployment metadata: name: nginx labels: app: nginx spec: selector: matchLabels: app: nginx template: metadata: labels: app: nginx spec: containers: - image: nginx:1.9.1 name: nginx ports: - containerPort: 80 name: http volumeMounts: - mountPath: /user/share/nginx/html name: data restartPolicy: Always volumes: - name: data emptyDir: {}
kustomization.yaml :
1
2
3
4
5
commonLabels: app: kustomize-nginx resources: - nginx-deployment.yaml
build的效果就是,把列出来的resources中的label,都换成app: kustomize-nginx:
1
2
3
4
5
6
7
8
9
10
11
12
13
14
15
16
17
18
19
20
21
22
23
24
25
26
27
28
29
30
31
32
33
34
35
36
37
38
39
$ diff <(kustomize build .) nginx-deployment.yaml 4,5d3 < labels: < app: kustomize-nginx 6a5,6 > labels: > app: nginx 10c10 < app: kustomize-nginx --- > app: nginx 14c14 < app: kustomize-nginx --- > app: nginx 17,24c17,24 < - image: nginx:1.9.1 < name: nginx < ports: < - containerPort: 80 < name: http < volumeMounts: < - mountPath: /user/share/nginx/html < name: data --- > - image: nginx:1.9.1 > name: nginx > ports: > - containerPort: 80 > name: http > volumeMounts: > - mountPath: /user/share/nginx/html > name: data 27,28c27,28 < - emptyDir: {} < name: data --- > - name: data > emptyDir: {}
应用到k8s,并且查看label。
1
2
3
4
5
[~/workspace/notes/kubernetes/examples/kustomize/base]$ kubectl apply -k . deployment.apps/nginx created [~/workspace/notes/kubernetes/examples/kustomize/base]$ kubectl get deploy -o wide NAME READY UP-TO-DATE AVAILABLE AGE CONTAINERS IMAGES SELECTOR nginx 1/1 1 1 7s nginx nginx:1.9.1 app=kustomize-nginx
overlay 修改副本数量 kustomization.yaml:
1
2
3
4
5
6
7
8
9
10
11
12
namePrefix: testing- commonLabels: app: kustomize-nginx variant: testing group: test bases: - ../../base patchesStrategicMerge: - nginx-deployment.yaml
nginx-deployment.yaml 为patch的内容:
1
2
3
4
5
6
apiVersion: apps/v1 kind: Deployment metadata: name: nginx spec: replicas: 2
名称metadata.name应当与base中的名称相同,因为使用名称做匹配,所做的patch是当前overlay,名为nginx的deployment的副本数量为2。
1
2
3
4
5
6
7
$ kubectl apply -k . deployment.apps/testing-nginx created [~/workspace/notes/kubernetes/examples/kustomize/overlay/testing]$ [~/workspace/notes/kubernetes/examples/kustomize/overlay/testing]$ kubectl get deployment NAME READY UP-TO-DATE AVAILABLE AGE nginx 1/1 1 1 19m testing-nginx 2/2 2 2 8s
覆盖镜像 kustomization.yaml:
前缀设置为develop,更新相应tag
通过images更新镜像
Nginx deployment的副本数量修改为5,这种方式与上一个修改副本数量 相比更简洁。
1
2
3
4
5
6
7
8
9
10
11
12
13
14
15
namePrefix: dev- commonLabels: app: dev-nginx variant: dev group: develop bases: - ../../base images: - name: nginx newTag: 1.19 .0 replicas: - name: nginx count: 5
部署到集群:发现kubectl内置的kustomize的replicas并没有得到支持,可能是内置的kustomize版本较老,使用kustomize + kubectl的方式可以部署到集群。
1
2
3
4
5
6
7
8
9
10
[~/workspace/notes/kubernetes/examples/kustomize/overlay]$ kubectl delete -k develop error: json: unknown field "replicas" [~/workspace/notes/kubernetes/examples/kustomize/overlay]$ kustomize build develop | kubectl apply -f - deployment.apps/dev-nginx created [~/workspace/notes/kubernetes/examples/kustomize/overlay]$ [~/workspace/notes/kubernetes/examples/kustomize/overlay]$ kubectl get deploy -o wide NAME READY UP-TO-DATE AVAILABLE AGE CONTAINERS IMAGES SELECTOR dev-nginx 5/5 5 5 17s nginx nginx:1.19.0 app=dev-nginx,group=develop,variant=dev nginx 1/1 1 1 10h nginx nginx:1.9.1 app=kustomize-nginx testing-nginx 2/2 2 2 10h nginx nginx:1.9.1 app=kustomize-nginx,group=test,variant=testing
https://kubectl.docs.kubernetes.io/references/kustomize/images/
更多功能 参考kustomize reference 。
kustomize常用命令 build 使用配置文件生成资源的YAML文件,并打印到标准输出。配合kubectl命令可以把资源部署到集群。
edit 通过命令行修改kustomization.yaml文件。这种办法可以方便的放到脚本中去修改kustomization.yaml,而不是手动去修改。比如operator-sdk的样例,通过edit命令指定资源所要使用的镜像。
edit的set命令 可以做以下几样事:
1
2
3
4
5
6
Available Commands: image Sets images and their new names, new tags or digests in the kustomization file nameprefix Sets the value of the namePrefix field in the kustomization file. namespace Sets the value of the namespace field in the kustomization file namesuffix Sets the value of the nameSuffix field in the kustomization file. replicas Sets replicas count for resources in the kustomization file
通过命令行修改前缀和镜像:
1
2
3
4
5
6
7
8
9
10
11
12
13
14
[~/workspace/notes/kubernetes/examples/kustomize/overlay]$ cp -r develop develop-dabin [~/workspace/notes/kubernetes/examples/kustomize/overlay/develop-dabin]$ kustomize edit set nameprefix "develop-dabin-" [~/workspace/notes/kubernetes/examples/kustomize/overlay/develop-dabin]$ kustomize edit set image "nginx:1.18.0" [~/workspace/notes/kubernetes/examples/kustomize/overlay/develop-dabin]$ head kustomization.yaml namePrefix: develop-dabin- commonLabels: app: dev-nginx group: develop variant: dev images: - name: nginx newTag: 1.18.0 replicas:
edit命令除了set外,还有add、remove、fix,能够更加完整的通过命令编辑kustomization.yaml文件。
本文样例:examples/kustomize 。
参考资料
